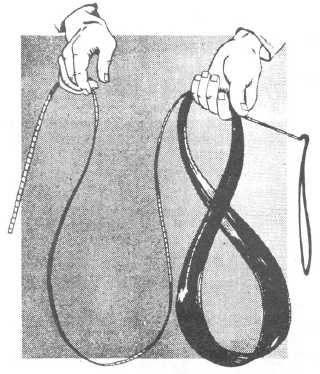
Grasp the 100-ft graduation on the tape faceup
with your left hand. Using your right hand, you take
in 5 ft of tape at a time. Place the 95-ft mark over the
100-ft mark, next the 90-ft mark over the 95-ft
mark—holding these 5-ft marks firmly with the left
hand so that the tape will not turn over. Continue
this operation for the entire length of the tape,
placing each 5-ft division over the preceding one until
the zero graduation is reached, (Actually, you can
start at either end of the tape, whichever is
convenient.) As you are taking in the tape, you will
notice that the coils fall into the shape of the figure
“8.” (See fig. 12-10.)
When you have completed this coiling, square up
the tape ribbons. The leather thong at the 100-ft end
should be on the underneath side of the coil next to
your hand. Wrap the thong around the complete coil.
Continue wrapping until there is just enough of the
thong left to conveniently insert it through the coil at
about the 50-ft graduation. Draw the thong firmly
back against the completed windings of the thong.
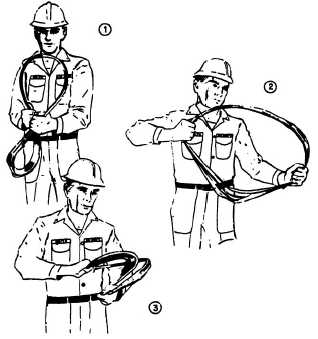
You can throw the tape into a more compact
circular roll by giving the “8” a twist, as shown in
figure 12-11. Now, tie the tape with the remaining
thong.
Figure 12-10.-Coiling a tape into a figure “8”
form.
Figure 12-11.-Throwing the tape into a circular
roll.
When you wish to use the tape again, reverse the
process. Be sure you let the tape out from the zero
end in the same way that it was wound. Walk away
from the end of the tape as you unwind it to prevent
kinks.
Chaining on Level Ground
When taping distances on a relatively level
surface and of the third or lower order accuracy, you
may lay the tape on smooth ground or on a paved
road or support its ends by taping stools or stakes. In
horizontal chaining, the tape is held horizontally, and
the positions of the pertinent graduations are
projected to the ground by a plumb bob and cord. For
ordinary chaining on level ground, the following
procedures are generally used:
1. A range pole is set on line slightly behind the
point toward which the taping will proceed. The rear
chainman, with one chaining pin, stations himself at
the starting point of the line to be measured.
2. The head chainman, holding the zero end of
the tape and with 10 pins in his hand, then moves
forward toward the distant point while guiding
himself with the range pole. Assuming that the tape
was already off the reel when they
12-11