
Figure 13-53.--Turning the trigger bar adjusting nut: Turn to the
right to correct for late timing; turn to the left to correct for
early timing.
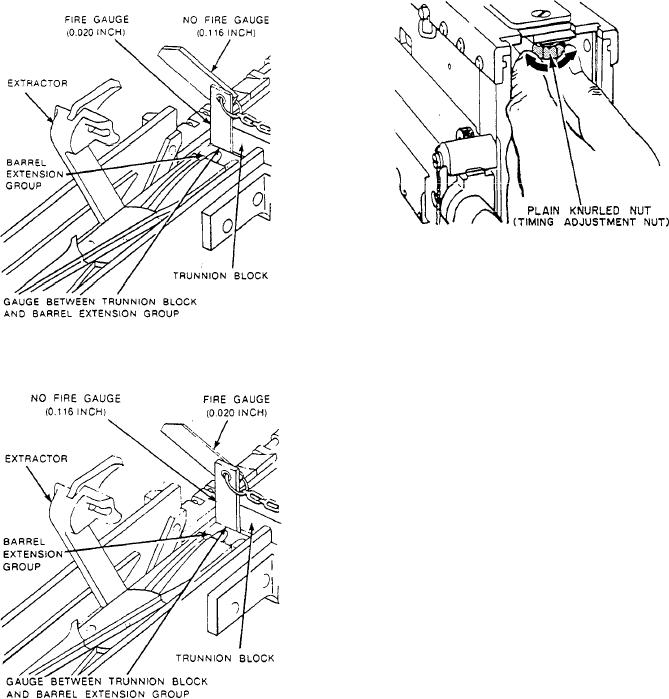
5. Allow the barrel extension to close on the gauge
Figure 13-51.--Checking the timing with the fire gauge installed.
slowly.
6. Depress the trigger. The firing pin should
release. Releasing indicates that the timing is correct (or
not late).
7. Retract the recoiling parts enough to remove the
FIRE gauge. Cock the gun and allow the recoiling parts
to go forward into the battery.
8. Retract the recoiling parts enough to insert the
NO-FIRE (.116 inch) gauge. Place it in the same
location, between the barrel extension and the trunnion
block (fig. 13-52).
9. Depress the trigger. The firing pin should not
release. Its failure to release indicates that the timing is
correct (or not early).
Late Timing Adjustment.-- If the timing of the gun
is late, the firing pin will not release with the FIRE gauge
installed. (Refer to Step 6 above.) To correct this
Figure 13-52.--Checking the timing with the NO-FIRE gauge
situation, perform the following steps:
installed.
1. Retract the recoiling parts enough to remove the
FIRE gauge. Allow them to return forward into the
timing is questionable. The following steps explain how
battery.
to check and set the timing adjustment:
2. Remove the backplate assembly. (See fig.
1. Ensure the headspace adjustment is correct. If
13-34.)
not, correct it before checking the timing.
3. Locate and turn the trigger bar adjusting nut one
2. Ensure the firing pin is cocked and the recoiling
notch to the right (fig. 13-53).
parts are forward in the battery position.
4. Reinstall the backplate assembly. (See fig.
3. Raise the extractor.
13-46.)
4. Retract the recoiling parts enough to insert the
5. Retract the recoiling parts enough to insert the
FIRE (.010 inch) gauge. Place it between the barrel
FIRE gauge again. Allow the barrel extension to close
on the gauge slowly.
extension and trunnion block (fig. 13-51).
13-30

