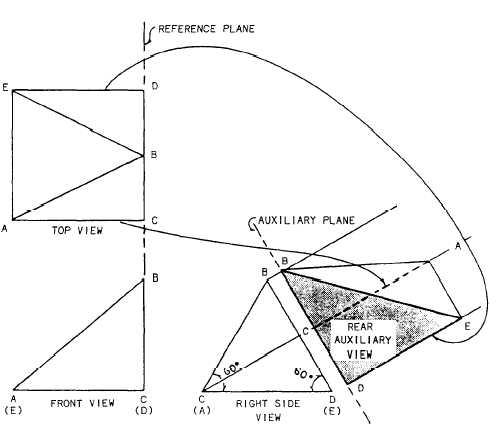
Figure 5-25.-Projection of rear auxiliary view.
Using the procedures previously described,
follow the steps taken to project and draw the rear
auxiliary view in figure 5-25.
Sometimes the total auxiliary view is not
needed. Such a view could possibly even make the
drawing confusing. In this case, a PARTIAL
AUXILIARY VIEW is used. Only the points or
lines needed to project the line or surface desired
are used. This reduces the number of projection
lines and greatly enhances the clarity of the view.
If a partial auxiliary view is used, then it must be
labeled PARTIAL to avoid confusion. In figure
5-24, if only the true length of line AB is desired,
the points A and B would be projected and
connected. The view would be complete after it
was labeled and dimensioned.
In some cases the shape of an object will
be such that neither the normal orthographic
view nor the auxiliary views will show the
true size and shape of a surface. When this
occurs, a SECONDARY AUXILIARY VIEW is
needed to describe the surface. The procedures
for projecting and drawing a secondary auxiliary
view are the same as those for a normal (or
primary) auxiliary view. The reference plane for
a secondary auxiliary view is located in the
orthographic view from which the primary
auxiliary view is projected. Usually, the primary
auxiliary plane becomes the secondary reference
plane. The secondary auxiliary plane is in the
primary auxiliary view, and its location is
determined in the same manner that the primary
auxiliary plane is determined.
AUXILIARY SECTION.— An auxiliary view
maybe a sectional, rather than a surface, view.
In the upper left part of figure 5-26, there is a
single-view projection of a block. It is desired
to show the right side of the block as it would
appear if the block were cut away on the plane
indicated by the dotted line, the angle of
observation to be perpendicular to this plane. The
desired view of the right side is shown in the
auxiliary section, which is projected from a front
view as shown. Because the auxiliary plane of
projection is parallel to the cutaway surfaces,
these surfaces appear in true dimensions in the
auxiliary section.
A regular multi-view of an orthographic
drawing is one that is projected on one of the
5-16

