APPENDIX V
SAMPLE SURVEY FIELD NOTES
Although some field notes are already
explained in this training manual, these sample
notes are presented so that you can see how the
series of different field notes are indexed and
arranged in a field notebook.
Keeping good notes is not only an art, it is a
science as well. Art will make your notes pretty
to look at, but it will not make them correct or
meaningful. You must decide, BEFORE YOU
GO INTO THE FIELD, how you want to run
your survey and how to record your observations.
You must also have decided what information you
must record in order to make your notes
meaningful. Keep in mind that extraneous entries
in your notes can do just as much harm as
omission of pertinent data. Before making any
entry in your notebook, make certain that the
entry, whether a sketch, remark, or other
information, is necessary and will contribute to
the completeness of the notes. On the following
pages are samples of the types of notes kept, not
of how they must be kept. It is really the surveyor
who determines what to record and how to do it.
Usually the chief of the party prescribes how notes
on his project are to be kept. Above all, decide
on your notekeeping procedures and format
before you go out on your survey. The headings,
members of party, instrument identification,
weather, and so forth, may all be entered before
you leave the office.
Figure AV-1 is a sample of the front page of
a notebook. The front page is to be filled out as
required by your unit. If possible, keep a separate
book for each major project.
Figure AV-2 is a sample index. The index
pages of the notebook must reflect all projects,
by page number,
recorded in the book.
REMEMBER: Always keep your index up to
date.
An example of recording horizontal measure-
ment is shown in figure AV-3. To record taping
problems, record distance measured (by parts of
tapes, if measured) going from one station to the
next. Record in the direction in which measured;
that is, down for forward measurements, up for
backward measurements.
Do not forget the page check (fig. AV-4),
which is to be made at the bottom of each page.
If notes exceed one page, this check also must be
made on the page where notes end, When you
make a page check on direct level circuit, you
check only the accuracy of the arithmetic, not the
accuracy of the level shots.
Profile and cross-section level notes (figs.
AV-5 and AV-6) are best recorded from the
bottom of the page UP. The left-hand side of the
page should contain columns for STA, BS(+), HI,
FS(–), and elevation. The right side, as shown,
has left, Q, and right columns. The top number
is ground elevation at that point, the center
number is rod reading, and the bottom number
is the perpendicular distance to the center line.
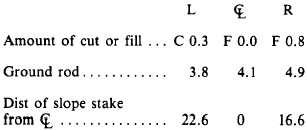
Slope stakes (fig. AV-7), as profile notes, are best
recorded from the bottom of the page UP, as
shown on this set of sample notes. Entries for STA
7 + 50 indicate the following:
See figure AV-8. Building corner numbers on
the sketch must agree with the designation on the
left side of the page. Grade rod setting is
computed in the field. Batter elevations are
entered in the first column on the right-hand
page—after having been computed at the jobsite.
Sketch must show all pertinent data for locating
the building.
AV-1


