main purpose of making your first drawings is to
learn to use instruments. Each drawing will
offer an opportunity for practice. Later on, good
form in the use of instruments will become a
natural habit.
Accurate pencil drawings are of first importance
since all inked drawings and tracings are made
from finished pencil drawings. It is a mistake to
believe that a poor pencil drawing can be corrected
when you make the ink tracing. Any drawing
important enough to be inked or traced in ink
must be accurate, legible, and neat. Because most
military and commercial blueprints are made from
pencil drawings, ambitious trainees will work to
acquire skill in pencil drawing as they perfect their
technique. Good technique and skillful pencil
drawing are basic to proficiency in drafting.
The following sections will guide you in
attaching your drawing paper to the board and
in drawing basic lines with the T square, triangles,
and pencil.
ATTACHMENT OF PAPER
TO THE BOARD
Now that you have become relatively familiar
with your equipment and materials, it is time to
get started by attaching your drafting paper to the
board. The sheet should be placed close to the left
edge of the drafting board. Working in this area
makes the T square easier to handle and reduces
the likelihood of error because of T square
“swing.” The drafting sheet should be far enough
from the bottom of the board (about 3 in.) to
ensure firm support for the head of the T square
when you are drawing at the lower part of the
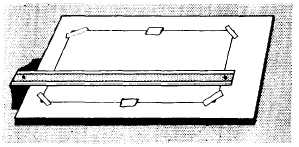
sheet. A drawing sheet properly attached to the
board on which a T square is used is shown in
figure 3-2. After aligning the drawing sheet,
smooth out any wrinkles and fasten the four
corners with short strips of drafting tape. If you
are attaching large sheets, you should place
additional strips of tape at the top and bottom
edges of the sheet. Drafting tape has a lighter
coating of adhesive than does masking tape.
Consequently, it will hold the drawing firmly, yet
can be removed without tearing or marring the
drawing. If you use masking tape or transparent
tape, leave a large margin in the event you tear
the paper when removing the tape. When placed
diagonally across the corners of the sheet, as
shown in figure 3-2, the drafting tape offers
little obstruction to movement of the T square and
triangles. Avoid the use of thumbtacks; they will
eventually ruin the drafting board.
If you are using a parallel straightedge or draft-
ing machine instead of a T square, the procedure
just described is the same with one exception.
Instead of placing the paper close to the left edge
of the board, you should place it approximately
at the midpoint of the length of the parallel
straightedge or in the center of the drawing board
surface when you are using a drafting machine.
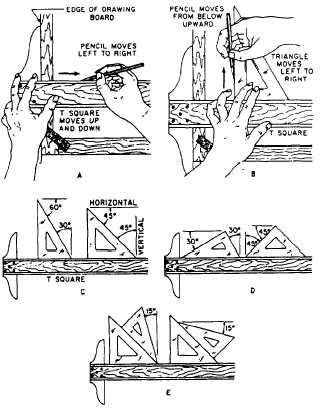
HORIZONTAL LINES
by
The draftsman’s horizontal line is constructed
drawing from left to right along the working
Figure 3-2.-Attaching drafting paper to the board.
29.275
Figure 3-3.-Construction of basic lines.
3-4