redrawn more quickly than mistakes can be
erased.
For making dimensioned sketches in the field,
you will need some sort of measuring tape—either
a pocket rule or a surveyor’s tape, depending on
the extent of the measurements taken. If you are
required to collect extensive field data, it would
be to your benefit to maintain a sketch notebook.
A surveyor’s field notebook works well for this
purpose.
TECHNIQUES OF SKETCHING
The sketch should conform to one of the stan-
dard types of projection discussed in this chapter.
You must apply correct proportion whenever
possible. When you use cross-section paper, its
grid will provide a ready scale that will aid you in
sketching proportionally. You do this by counting
the squares within the object to be drawn. The size
of your sketch depends upon the complexity of
the object and the size of paper you are using.
Sketching Straight Lines
In sketching lines, place a dot where you want
a line to begin and one where you want it to end.
In sketching long lines, place one or more dots
between the end dots. Then swing your hand in
the direction your line should go, and back again
a couple of times before you touch your pencil
to the paper. In this way you get the feel of the
line. Then use these dots to guide your eye and
your hand as you draw the line. Draw each line
with a series of short strokes instead of with one
stroke. Using short strokes, you can better
control the direction of your line and the pressure
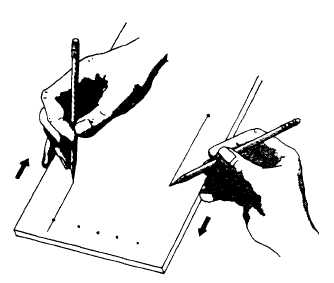
Figure 5-58.-Use of paper, pad, or table as a guide when
drawing straight lines.
of your pencil on the paper. Hold the pencil about
three quarters of an inch to an inch from the point
so that you can see what you are doing. Strive for
a free and easy movement rather than a cramped
finger and wrist movement.
Another useful technique in drawing straight
lines is to use the side of the paper, pad, or table
as a guide for your hand. Hold the pencil at the
desired starting point of the line and place the heel
of your hand and one finger on the guide, as
shown in figure 5-58. Move the pencil, in this case,
with one uniform stroke to complete the line. Try
drawing several light horizontal lines and, after
each one is drawn, examine it for straightness,
weight, and neatness. If it is too light, use either
a softer pencil or a little more pressure.
Vertical lines are usually sketched downward
on the paper. The same suggestions for using
locator dots, free movement of the entire arm,
and guides apply to vertical lines as they do to
horizontal lines.
Slanting lines may be drawn from either end
toward the other. For better control, you might
find it helpful to rotate the paper, thus placing
the desired slanting line in either the horizontal
or vertical position.
To keep your sketch neat, first sketch your
lines lightly. Lines not essential to the drawing can
be sketched so lightly that you need not erase
them. Darken essential lines by running your
pencil over them with more pressure. Figure 5-59
shows line conventions drawn with various types
of pencil points.
Figure 5-59.-Line conventions drawn with various types of
pencil points.
5-30