subangular or subaounded, depending on which shape
predominates.
Laboratory analysis must be performed when
accurate grain size distribution is to be determined.
However, you can approximate the distribution by
visual examination using the following steps:
1. Separate the larger grain particles from the rest
of the soil sample by picking them out one at a time.
2. Examine the remainder of the soil and estimate
the proportion of visible individual particles (larger than
the No. 200 sieve) and the fines.
3. Convert these estimates into percentages by
weight of the total sample. If the fines exceed 50 percent,
the soil is considered fine-grained (M, C, or O); if the
coarse material exceeds 50 percent, the soil is
coarse-grained (G or S).
4. Examine the coarse-grained soil for gradation of
particle sizes from the largest to the smallest. A good
distribution of all sizes without too much or too little of
any one size means the soil is well-graded (W).
Overabundance or lack of any size means the material
is poorly graded (P).
5. Estimate the percentage of the fine-grained
portion of the coarse-grained soil. If nonplastic fines are
less than 5 percent of the total, the soil maybe classified
either as a GW, GP, SW, or SP type, depending on the
other information noted above.
6. If the fine-grained portion (Step 5 above)
exceeds 12 percent, the soil is either silty (M) or clayey
(C) and requires further testing to identify.
7. Fine-grained portions (Step 5 above) between 5-
and 12-percent (nonplastic fines or fines not interfering
with drainage, or 0 to 12 percent plastic fines) total are
border line and require a double symbol (GW-GM or
SW-SM).
8. Fine-grained soils (M, C, or O) from Step 3
above require other tests to distinguish them further.
Grain size distribution of fine portions is normally not
performed in field identification. However, should it
become necessary, you can approximate the grain size
of the fines by shaking them in a jar of water and
allowing the material to settle. The materials settle in
layers of different sizes from which the proportion can
be estimated. It should be kept in mind that gravel and
sand settle into a much denser mass than either clay or
silt.
If you use the characteristics determined up to this
point, it is possible to evaluate the soil as it appeared in
place (undisturbed). Gravels or sands can be described
qualitatively as loose, medium, or dense. Clays maybe
hard, stiff, or soft. The ease or difficulty with which the
sample was removed from the ground is a good
indicator. Soils that have been cultivated or farmed can
be further evaluated as loose and compressible. Highly
organic soils can be spongy and elastic. In addition,
moisture content of the soil influences the in-place
characteristics. This condition should be recognized and
reported with the undisturbed soil properties.
BREAKING OR DRY-STRENGTH
TEST
The breaking test is done only on the material
passing the No. 40 sieve. This test as well as the roll test
and the ribbon test, is used to measure the cohesive and
plastic characteristics of the soil. The test normally is
made on a small pat of soil about 1/2 inch thick and about
1 1/2 inches in diameter. The pat is prepared by molding
a portion of the soil in the wet plastic state into the size
and shape desired and then allowing the pat to dry
completely. Samples may be tested for dry strength in
their natural condition as they are found in the field
However, you should not depend too much on such tests
because of the variations that exist in the drying
environment under field conditions. You may
approximate the dry strength by such a test however,
and verify it later by a carefully prepared sample.
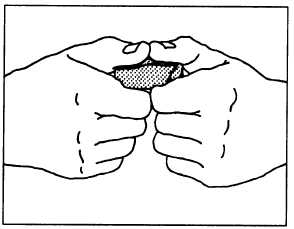
After the prepared sample is thoroughly dry, attempt
to break it using the thumbs and forefingers of both
hands (fig. 16-5). If you are able to break it, then try to
powder it by rubbing it with the thumb and fingers of
one hand.
Figure 16-5.-Breaking or dry-strength test.
16-17