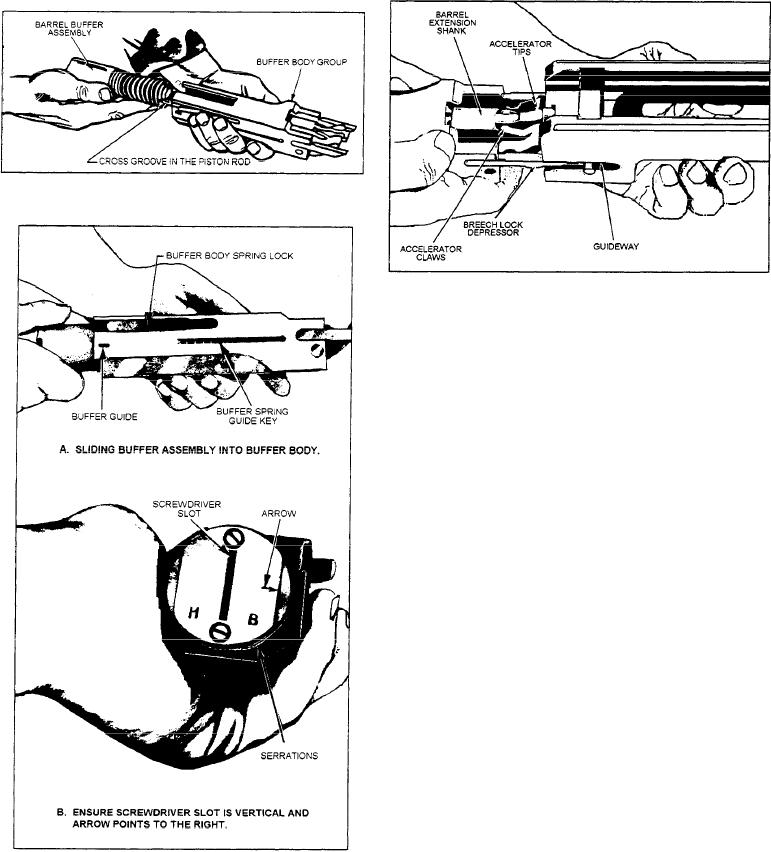
Figure 13-42.--Removing the buffer assembly.
Figure 13-44.--Joining the buffer body and barrel extension
groups.
GENERAL ASSEMBLY
To reassemble the .50-caliber BMG, replace the
major component groups in reverse order. You should
follow certain procedures to do the job correctly. These
procedures are explained in the following paragraphs.
Replace Buffer Assembly
Slide the buffer assembly into the buffer body
group, as shown in figure 13-43, view A. Ensure the
spring guide key fits into the slot in the buffer body.
Turn the buffer tube until the screwdriver slot is
vertical (view B). The arrow on the tube must point to
the right. The stud on the tube lock will now engage the
serration in the buffer tube. That keeps the tube from
turning. Push the buffer assembly all the way forward.
Replace Buffer Body and
Barrel Extension Groups
Figure 13-44 shows how these two groups are
joined together. Align the breech lock depressors with
their guideways in the barrel extension. Also, engage the
barrel extension shank to the accelerator claws, as
shown.
Push the two groups together. Press down on the
accelerator tips to ensure the two groups are locked
together. Place them into the rear of the receiver. Push
Figure 13-43.--Replacing the buffer assembly.
them forward until the buffer body spring lock (fig.
13-43, view A) snaps in place. Properly locked in place,
Remove Buffer Assembly
the buffer tube should protrude about 1 1/8 inches from
the rear of the buffer body group.
To remove the buffer assembly, hold the buffer
body, as shown in figure 13-42. Pull the buffer assembly
Replace Bolt Group
to the rear. That completes the general disassembly of
the .50-caliber BMG. Limited cleaning, maintenance,
Figure 13-45 shows how the bolt group is replaced
and major part/group replacement can be done now.
into the receiver. The top of the cocking lever must be
13-24

