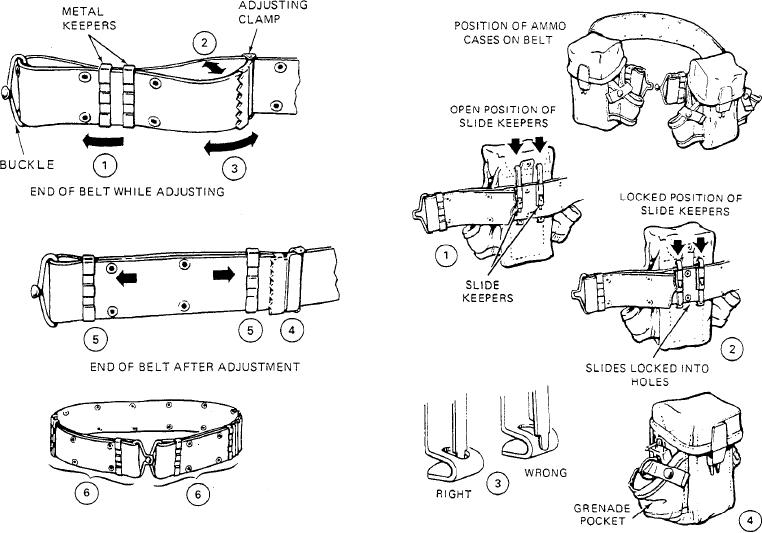
Figure 2-3.--Adjusting the belt.
Figure 2-4.--Attaching ammo pouch to belt.
4. Squeeze the adjusting clamp to lock it in place.
5. Move the metal keepers so one is next to the
keepers are vertical and the bottoms are out beyond the
adjusting clamp and the other is next to the buckle.
webbing.
6. Adjust the other end of the belt the same way.
2. Push the slides of the keepers down and into the
Both clamps should be about the same distance from the
bottom holes.
buckle.
3. Make sure you push the slides firmly into
Your belt is now ready for attaching equipment.
the holes; otherwise, the slide is in the WRONG
position, as shown in the sketch, and the equipment
could fall off.
Attaching the Ammunition
Pouch to Your Belt
4. Use the pockets on each side of the ammo pouch
for carrying fragmentation hand grenades. Be sure, tier
putting them in, that the nylon strap goes through the
The following four steps used in attaching the
ring and is snap fastened, as shown in the sketch.
ammunition pouch to your belt correspond to the four
actions shown in figure 2-4:
NOTE: If you have a 20-round magazine pouch
for the M-16 rifle, refer to Step 6 of the following
1. Pull each keeper up to its open position and slide
it over only one thickness of webbing. Make sure the
procedure to attach them.
2-5

