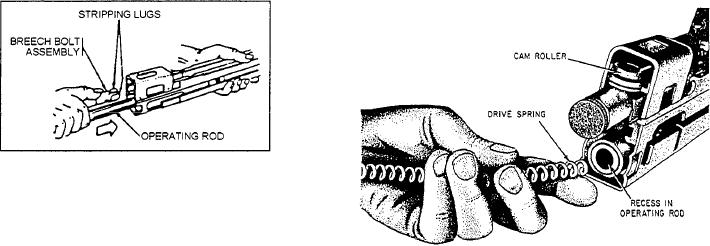
Figure 13-25.--Inserting the operating group in the receiver.
carrying handle. General disassembly is completed after
removal of the other five groups from the receiver
Figure 13-26.--Inserting the drive spring.
group.
Replacing the Barrel Group
and push in the drive spring until the head of the guide
is approximately an inch from the receiver (fig. 13-19).
Ensure the barrel-lock lever on the M60 is in the
vertical position (fig. 13-24). Insert the rear of the barrel
Replacing the Buffer Group
under the barrel cover and align the gas cylinder nut with
its recess in the forearm assembly. Lower the barrel-lock
lever.
Insert the buffer plunger into the drive spring guide
(fig. 13-19). Push forward on the buffer until the
Replacing the Trigger Housing Group
operating rod and bolt go forward fully.
Push in on the buffer until the recesses on the buffer
Engage the holding notch of the M60 trigger
are aligned with the recesses in the receiver. Replace the
housing in its recess in the bottom of the receiver
buffer yoke from the top of the receiver (fig. 13-18).
(fig. 13-23). Rotate the front of the trigger housing up
and align the holes of the trigger housing with the
Replacing the Stock Group
mounting bracket on the receiver. Insert the trigger
housing pin from the left.
Align the guide rails of the M60 stock with the guide
Engage the rear leaf spring with the sear pin
rails on the receiver. Push forward until the stock is frilly
(fig. 13-22). Ensure the leaf spring is positioned so the
seated. A distinct click will be heard when the latch
bent portion is pressed against the side of the trigger
engages.
housing. Rotate the front of the spring up and engage it
with the trigger housing pin.
Check for Correct Assembly
Replacing the Operating Group
To check for correct assembly, pull the cocking
Insert the end of the M60 operating rod into the
handle to the rear and return it to its forward position.
receiver. Hold the rod with one hand. With your other
Close the cover and pull the trigger. The bolt should go
hand, push forward on the rear of the bolt, causing the
forward.
bolt to rotate until the locking lugs are in a vertical
position, as shown in figure 13-25.
AMMUNITION
With the cam roller up, push the operating rod and
the bolt into the receiver until the end of the operating
As a member of the M60 machine gun crew, you
rod is even with the rear of the receiver, as shown in
must be able to recognize the types of ammunition
figure 13-26.
available and know how to care for the different types.
Insert the drive spring guide into the drive spring;
Based upon the type of projectile, the ammunition
then insert the opposite end of the drive spring into the
authorized for the M60 machine gun is classified as
recess of the operating rod (fig. 13-26). Pull the trigger
follows:
13-15

