on the tripod head threads. Rotate the footplate
counterclockwise one-fourth turn or until the
instrument seats itself; then rotate it clockwise to
engage the head nut threads to the tripod head
threads. If the threads do not engage smoothly,
they are cross-threaded. Do not force the head
if you encounter resistance, but back it off, square
up the instrument, and try again gently to engage
the threads. When they engage, screw the head
nut up firmly but not too tightly. Setting up the
instrument too tightly causes eventual wearing of
the threads, making unthreading difficult.
After you have attached the instrument, if you
are set up on stable soil, thrust the tripod legs’
tips into the ground far enough to be sure of a
stable support, taking care to keep the footplate
approximately level. Some tripods have legs
equipped with short metal stirrups. These stirrups
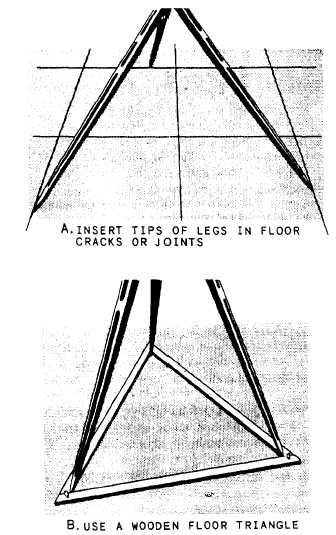
Figure 14-6.-Two ways of preventing tripod legs from
spreading on hardened surface.
allow you to force the legs’ tips into the ground
by foot pressure.
If you are set upon a hardened surface, such
as concrete, make sure the tripod legs do not
accidentally spread, causing the tripod to collapse.
In figure 14-6, view A, the legs’ tips are inserted
in cracks in a concrete pavement. In figure 14-6,
view B, they are held by an equilateral wooden
triangle called a floor triangle.
Leveling the Engineer’s Level
As a rodman, you must concentrate on
keeping your rod perfectly plumb. Readings on
a rod that is out of plumb are inaccurate.
Similarly, as a levelman, you must constantly
bear in mind that the line of sight through
the telescope must be perfectly level in every
direction or every reading you make with the
instrument will be inaccurate. After you initially
place the instrument, level it carefully as follows:
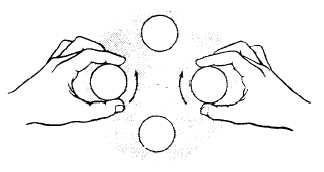
Train the telescope in line with a pair of level
screws and manipulate the level screws by turning
them in opposite directions, as shown in figure 14-7,
until the bubble in the level vial is in the exact
center. It is helpful to know that the bubble in the
level vial will move in the direction that your left
thumb moves. To put this another way: When you
turn the left-hand screw clockwise, the bubble
moves to your left; when you turn the left-hand
screw counterclockwise, it moves to your right.
When the bubble is centered with the telescope
over one pair of screws, train the telescope over
the other pair and repeat the process. As a check,
swing the telescope over each pair of screws in
all four possible positions to make sure the
bubble is centered in each position.
Making Direct Readings
The instrumentman makes a direct rod reading
as viewed directly on the graduation of the rod
(self-reading) that is in line with the horizontal
Figure 14-7.-Manipulating level screws.
14-8