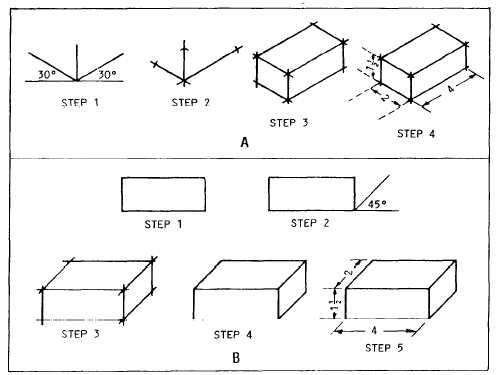
Figure 5-69.-Sketching a rectangular block: A. Isometric; B. Oblique.
PICTORIAL SKETCHES instead of multi-view
orthographic sketches. Pictorial sketches provide
you with a quick method of examining tentative
construction details. A quick pictorial sketch
will also help you in the layout of isometric and
oblique drawings.
The principles of pictorial and orthographic
sketching are similar, except that in pictorial
sketching you will be dealing with volumes rather
than flat planes. Basically, pictorial sketches and
pictorial drawings are practically the same except
for the drawing materials used in their develop-
ment and the fact that pictorial sketches are not
normally drawn to scale. By following a few sim-
ple steps, based on pictorial drawing construction
principles, you should be able to prepare
meaningful pictorial sketches.
ISOMETRIC SKETCHES.— Select a position
(view) that will show the object to the best
advantage. You will know what you want
included in your sketch, so move either the
object or yourself until you can actually see
everything you want to show. If the object is
something you have in mind or if you intend to
sketch an isometric view from an orthographic
drawing, you will have to visualize the object and
assume a viewing position. In making your
isometric sketch, remember that you start by
sketching three isometric axes 120 degrees apart,
using two angles of 30 degrees and a vertical axis
of 90 degrees. Figure 5-69, view A, shows a step-
by-step procedure that can be used in making an
isometric sketch of a wooden rectangular block
measuring 1 1/2 in. by 2 in. by 4 in.
The first step is to sketch the three isometric
axes, as mentioned earlier. The second step is to
mark off the 1 1/2 in. for height on the vertical
axis, the 2-in. width along the left axis, and the
4-in. length along the right axis. The third step
is to draw two vertical lines 1 1/2 in. high
(starting with the marks on the right and left axis),
then sketch parallel lines from each of the marks
on the sketch. Note that the lines that are parallel
on the object are parallel on the sketch. The
fourth step is to dimension the sketch. The dimen-
sions on an isometric sketch are placed parallel
to the ends or edges. The final step is to check
the sketch for completeness and accuracy.
OBLIQUE SKETCHES.— The front face or
view of an OBLIQUE SKETCH is drawn the
same way as an orthographic front view. Using
the same wooden block that was sketched
5-35


