drawing circles and curves using straight lines as
construction lines. First, draw two straight lines
crossing each other at right angles, as in figure
5-63, view A. The point at which they cross will
serve as the center of the circle. The four lines
radiating from this center will serve as the radii
of the circle. You can use a piece of marked scrap
paper to measure an equal distance on each radius
from the center. Sketch a square, with the center
of each side passing through the mark defining
a radius. (See fig. 5-63, view B.) Now sketch in
your circle, using the angles of the square as a
guide for each arc. When larger circles are
required, you can add 45-degree angles to the
square to form an octagon. This will provide four
additional points of tangency for the inscribed
circle.
In figure 5-63, view C and view D, four lines,
instead of two, are sketched crossing each other.
The radii are measured as in constructing the other
circle, but a square is not drawn. For this method,
you will find it helpful to rotate the paper and
sketch the circle in one direction.
For drawing large circles, you can make a
substitute for a compass with a pencil, a piece of
string, and a thumbtack. Tie one end of the string
to your pencil near the tip. Measure the radius
of the circle you are drawing on the string, and
insert your tack at this point. Now swing your
pencil in a circle, taking care to keep it vertical
to the paper.
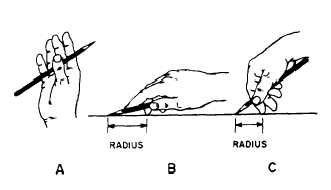
Another technique for drawing circles is
shown in figure 5-64. In view A of figure 5-64,
observe how the pencil is held beneath the four
fingers with the thumb. This grip tends to
produce a soft or easy motion for sketching large
circles or curves and also makes it possible to
sketch small circles, as shown in figure 5-64, views
B and C. You notice in figure 5-64, view B, that
the second finger rests at the center of the circle
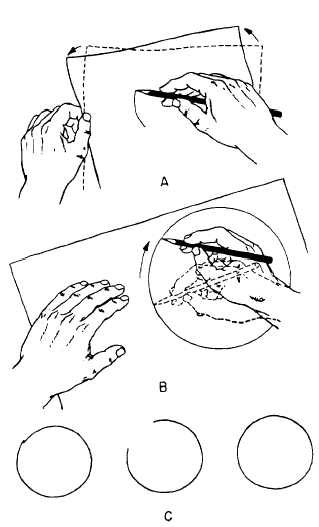
Figure 5-65.-Steps in sketching a circle.
and forms the pivot about which the pencil lead
can swing. The distance from the fingertip to the
pencil lead determines the radius of the circle. To
draw smaller circles, you need to assume a
somewhat different grip on the pencil, as shown
in view C of figure 5-64, but the principle is the
same.
Figure 5-64.-Proper pencil grip in sketching circles and
arcs.
As shown in view A of figure 5-65, the first
step in sketching either large or small circles with
the grips shown in the previous figure is placing
the second finger on the paper at the center of
the proposed circle. Then, with the pencil lightly
touching the paper, use the other hand to rotate
the paper to give you a circle that may look like
the one in figure 5-65, view B. To correct the slight
error of closure shown in view C, erase a sub-
stantial section of the circle and correct it by eye,
as shown at the right. You now have a complete
and round circle, but with only a very light line,
5-32


