edge of a T square, as shown in figure 3-3, view
A. This working edge, when true, is perpendicular
to the working edge of the drafting board. When
you draw horizontal lines, keep the working edge
of the T square head in firm contact with the
working edge of the drafting board. The pencil
should be inclined to the right at an angle of about
60 degrees, with the point close to the junction
of the working edge and the paper. Hold the
pencil lightly and, if it was sharpened with a
conical point, rotate it slowly while drawing the
line to achieve a uniform line width and preserve
the shape of the point. Normally, when a series
of horizontal lines is being drawn, the sequence
of drawing is from the top down.
VERTICAL LINES
Vertical lines are produced parallel to the
working edge of the drafting board by using
triangles in combination with a T square. One leg
of a triangle is placed against the working edge
of the blade and the other faces the working edge
of the board to prevent the draftsman from
casting a shadow over his work. Lines are drawn
from the bottom up, as shown in figure 3-3, view
B. The pencil is inclined toward the top of the
working sheet at an angle of approximately 60
degrees, with the point as close as possible to the
junction of the triangle and the drafting paper.
Sequence in drawing a series of vertical lines is
from left to right. At no time should the lower
edge of the T square blade be used as a base for
triangles.
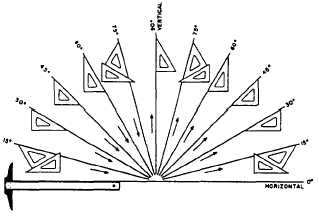
Figure 3-4.-Using T square (or parallel straightedge) and
triangles to draw lines at different angles to the
horizontal. Arrows indicate the direction in which the
lines should be drawn.
INCLINED LINES
The direction or angle of inclination of an
inclined line on a drafting sheet is measured by
reference to the base line from which it is drawn.
Inclined lines at standard angles are constructed
with the T square as a base for triangles used
either singly, as shown in views C and D of figure
3-3, or in combination, as shown in view E of
figure 3-3.
Used in combination with the T square as a
base, the triangles serve as guides for producing
lines at intervals of 15 degrees, as shown in figure
3-4. Used singly, the 45-degree triangle will divide
a circle into 8 equal parts; the 30°/60° triangle
will divide a circle into 12 equal parts. For
drawing lines at angles other than those described
above, you should use a protractor.
PROTRACTION OF ANGLES
To measure an angle, place the center mark
of the protractor at the vertex of the angle, with
the 0-degree line along one side. Then note the
degree mark that falls on the side. To lay off an
angle, position the protractor as above and use
a needlepoint or a sharp-pointed pencil to mark
the desired values. Then project lines from the
vertex to these marks.
Using only the three points on the protractor,
as described above, may result in considerable
inaccuracy, particularly if the lines of an angle
are to be extended for some distance beyond the
protractor. A refinement of the procedure is
indicated in figure 3-5. Suppose angle BOA is to
Figure 3-5.-Protracting an angle.
3-5


