about one grade softer than the pencil used for
corresponding line work. For dim construction
lines, use 4H to 6H leads. Avoid using leads that
are too short.
The compass lead should be sharpened with
a single elliptical face, as shown in figure 3-7, view
A. A sandpaper pad works best for sharpening
compass leads. The elliptical face of the lead is
normally placed in the compass so that it faces
outward from the other compass leg. Adjust the
shoulder-end needlepoint so that the point extends
slightly farther than the lead (fig. 3-7, view B).
With the needlepoint pressed lightly in the paper,
the compass should be centered vertically when
the legs are brought together.
Bow compasses and pivot joint compasses are
used in the same manner. To draw a circle with
a compass, lightly press the needlepoint into the
drawing paper and rotate the marking leg around
it. Always rotate the compass clockwise. As you
rotate, lean the compass slightly forward. With
a little practice, you will find that you can easily
draw smooth circles using only the thumb and
forefinger of one hand. It is important that you
use an even pressure as you rotate the compass.
You may find it necessary to rotate the compass
several times to produce a circle with a uniform
dense black line.
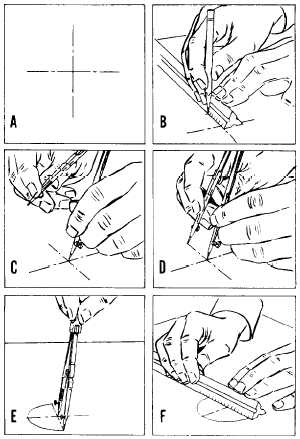
When you wish to set the compass to draw a
circle of a given diameter, use a piece of scratch
paper and follow the steps listed below,
referring to figure 3-8.
1. Draw a horizontal line with a straightedge.
2. With the straightedge as a base, use a
triangle and draw a vertical line intersecting the
horizontal line (fig. 3-8, view A).
3. Measure the radius of the circle with a
scale, as shown in figure 3-8, view B, and draw
a second vertical line from this point.
4. Set the needlepoint at the intersection of
the first vertical line and the horizontal line (fig.
3-8, view C). This is the center of the circle.
5. Set the marking leg to fall on the
intersection of the second vertical line and the
horizontal line (fig. 3-8, view D).
6. Draw a half circle with the compass
fig. 3-8, view E).
7. Check your
diameter established
(fig. 3-8, view F).
work by measuring the
by this half circle with a scale
Figure 3-8.-Drawing a circle of a given radius.
45.157
Once You have set the compass to the exact
radius of the circle, handle it very carefully so that
you don’t disturb the setting. Set the needlepoint
at the center of the circle and carefully rotate
the compass to draw a line describing the
circumference of the circle. Do not apply too
much pressure on the needlepoint or it will bore
a hole in the paper and you will lose the accurate
center mark. To keep the diameter of the hole to
a minimum, you may set the needlepoint of the
compass on a small strip of paper or thin
cardboard over the drafting sheet at the center of
the circle.
When you are using the pencil leg to draw
circles smaller than 1 in. in radius, keep the
adjustable pencil and needle legs straight. For
larger circles, both legs should be adjusted so that
they are perpendicular to the paper. On the other
hand, when you are using the compass with the
pen leg, you MUST adjust it at the hinge joint
to keep it perpendicular to the paper for all size
3-7


