Figure 1-24.--Lubrication points of a spray gun.
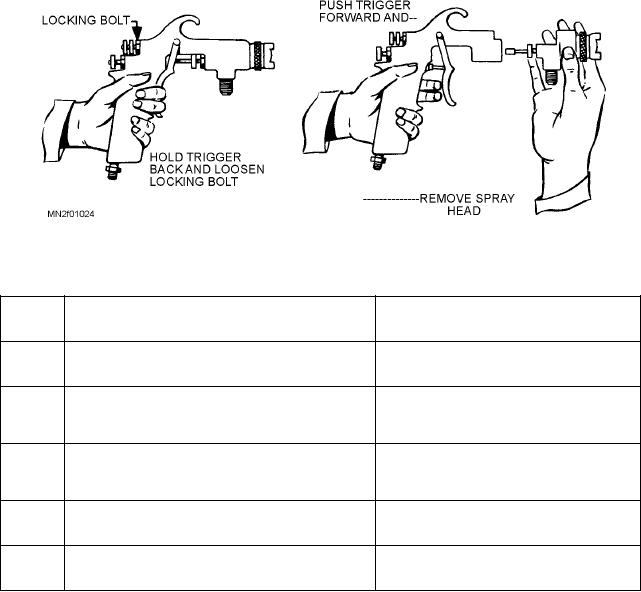
Table 1-3.--Spray Head Removal and Replacement Procedures
STEP
REMOVAL PROCEDURES
REPLACEMENT PROCEDURES
1
Remove the gun from the air hose line.
Push the trigger forward.
2
Hold the gun in your left hand and pull the
Insert the spray head.
trigger all the way back.
3
Loosen the locking bolt with the wrench
Hold the trigger back.
provided for that purpose.
4
Push the trigger forward as far as possible.
Tighten the locking bolt.
5
Pull the spray head forward.
equipment before they are allowed to operate the
2. NEVER allow an untrained person to use the
equipment.
equipment or to assist in its operation. Training must
stress the potential dangers associated with the
3. NEVER put your hands or fingers in front of the
handling of airless spray paint equipment. Although
nozzle.
safety features designed to minimize those dangers
4. NEVER point the gun at a person.
have been built in, amputations and deaths have
resulted from careless use of this equipment,
5. N E V E R w o r k o n o r r e p a i r p r e s s u r i z e d
equipment. (The equipment must be turned
particularly when the spray tips were removed for
OFF, the pressure released, and the trigger
cleaning. Before a spray tip is removed or adjusted or
safety engaged before being disassembled.)
when spray operations are shut down for an extended
period, turn the electrical power OFF and depress the
(TURNING OFF THE POWER DOES NOT
gun trigger to bleed the line pressure.
RELEASE THE PRESSURE.)
Refer to the operator's manual supplied with each
6. NEVER spray a flammable solvent through the
airless spray gun for the safety precautions peculiar to
gun tip. (The high velocity generates static
that model of gun. The following list of safety
electricity, which could cause a fire or an
explosion.)
precautions must be observed when any airless spray
gun is being used:
7. NEVER plug leaks with fingers. Before use,
check hoses for leaks, cuts, and wear. Replace
1. NEVER use airless equipment unless you are
any damaged hose.
fully trained to do so.
1-23

