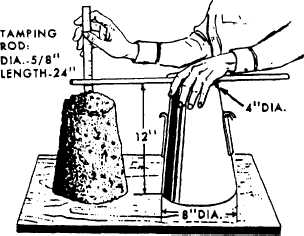
Figure 15-41.-Measurement of slump.
in subsidence of the concrete below the top
edge of the cone, add additional concrete to
keep an excess of concrete above the top of the
cone at all times. After the top layer has been
rodded, strike the surface of the concrete off flush
by means of a screeding and rolling motion of the
tamping rod. Immediately remove the slump cone
from the sample by carefully and steadily lifting
it straight up at the rate of 5 ± 2 sec for the height
of the cone. Place the cone next to the test
specimen. At this point, the entire test from the
start of filling the cone to completing the removal
of the cone should not exceed 2 1/2 min.
In measuring the slump, first place the
tamping rod across the top of the cone so
that it extends over the test specimen as shown
in figure 15-41. Next, measure the vertical
distance from the bottom of the rod to the
average height of the subsided concrete speci-
men. This measurement is known as the SLUMP.
If a decided falling away or shearing off
of concrete from one side or portion of the
specimen mass has occurred, disregard the
slump measurement and make a new test on
another portion of the sample. If two con-
secutive tests show a falling away or shearing
off, the concrete probably lacks the necessary
plasticity and cohesiveness for the slump test to
be applicable.
After measuring and recording the slump, you
have completed the slump test. As a supplemen-
tary procedure, however, tap the sides of the
specimen gently with the tamping rod. The reac-
tion of the concrete indicates its cohesiveness and
workability. A well proportioned, workable mix
gradually slumps to lower elevations and retains
its original identity. A poor mix crumbles,
segregates, and falls apart.
If the slump testis performed for a trial batch
during concrete mix design, then too little, or too
much, slump indicates the need for a new trial
batch with revised ingredient proportions. When
the test is performed as a quality control mea-
sure for a construction project, the slump ob-
tained by testing will be compared to the
specified slump for the concrete used for that
particular project. If too little, or too much,
slump has been determined by the test, then the
quality control inspector, or other appropriate
authority, will determine whether to accept or
reject the concrete.
PREPARATION OF CONCRETE
SPECIMENS
Concrete specimens that are representative of
a distinct batch of concrete must be sampled and
analyzed for the purpose of quality control.
Cylinder Specimens
Tests are performed on concrete cylinder
specimens to evaluate the compressive strength of
the concrete. The standard cylindrical specimen
is 6 in. in diameter by 12 in. long.
STANDARDS FOR CYLINDER MOLDS.—
Cylinder molds should be made of steel, cast
iron, or other nonabsorbent material that does
not react with concrete containing portland
cement or other hydraulic cements. Molds should
hold their dimensions and shapes under conditions
of severe use. They should be able to hold,
without leakage, the water poured into them.
Before using the molds, coat them lightly with
mineral oil or a suitable nonreactive form of
release material.
FILLING CYLINDER MOLDS.— Place the
molds on a level, rigid surface, free of vibration
or other disturbances, at a place as near as possible
to the location where they are to be stored for the
first 24 hr.
Fill the molds with concrete specimens (taken
as previously described for the slump test). The
number of layers is determined by the mold size
15-37


