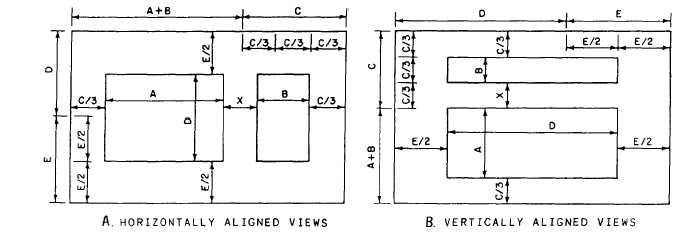
Figure 5-13.-Proper spacing of views.
give the appearance of a balanced drawing.
An easy way to locate horizontally aligned
views on a standard size drawing sheet is
shown in figure 5-13, view A. With a compass or
scale, lay off the length plus the width of the
object (A + B) from one end of the horizontal
margin.
Divide the remaining distance, C,
into three equal parts (C/3). This will be
the approximate distance from either view
to the vertical margin. The two views should
be equidistant from the vertical margin. The
spacing between views should be adjusted so
that the apparent area is close to the apparent
area between either view and the vertical
margin.
Basically, the shape of the object
will determine the space between views. Generally,
the distance from the views to the vertical
margins and the distance between views (X)
will be approximately equal. To locate the
views vertically on the paper, lay off the depth
of the object (D) on the vertical margin. Divide
the remaining distance (E) into two equal parts
(E/2). This will be the approximate distance from
the top or bottom of the view to the horizontal
margins.
The same method also applies to vertically
aligned views on a standard size drawing sheet,
as shown in figure 5-13, view B.
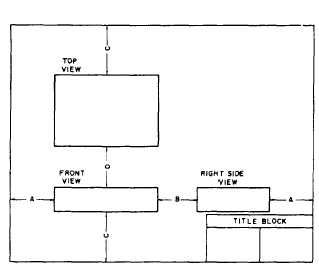
Proper spacing of a three-view drawing is
shown in figure 5-14. As you can see, the
principle is the same as that applied in spacing
a two-view drawing. Distances are again equal as
indicated, with distance B equal to, or slightly less
than, distance A, and distance D equal to, or
slightly less than, distance C.
Figure 5-14.-Proper spacing of views on a three-view
projection.
While the spacing of views in figure 5-14 is
technically correct, the drawing has an unbalanced
appearance because of the large area of empty
space in the upper right corner and because the
right side view crowds the title block. If the
drawing will contain a sizeable bill of materials
in the upper right corner, this spacing will be
satisfactory. If not, it should be improved, if
possible.
If the object is one that allows an arbitrary
choice with regard to the designation of surfaces
as top, front, and so on, the spacing can be im-
proved by changing the designation shown in
figure 5-14 and projecting the object as shown in
figure 5-15. That which appears as the top in
5-8


