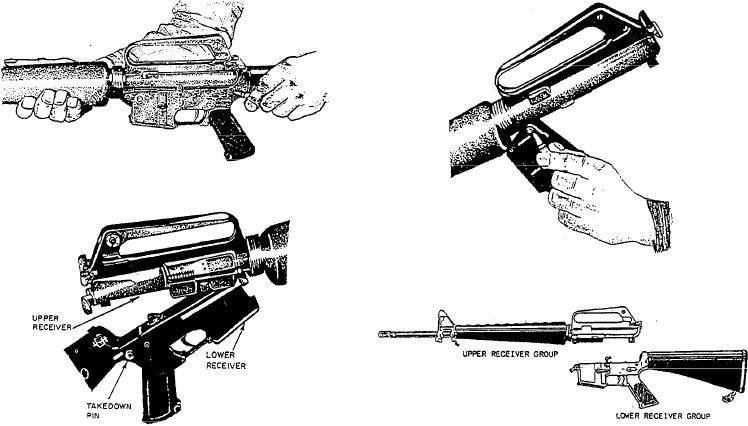
Figure 3-9.--Pressing takedown pin to the right.
Figure 3-11.--Pressing out receiver pivot pin.
Figure 3-10.--Breaking upper receiver away from lower receiver.
Figure 3-12.--Upper and lower receiver groups.
forefinger of the right hand, depress the charging handle,
surface in the order of removal from left to right. This
latch it with the right thumb, and pull to the rear (fig.
makes reassembly easier because you can assemble the
3-7). When the bolt is fully rearward, press the bottom
parts in the reverse order of disassembly.
of the bolt catch with the thumb or forefinger of the left
The steps infield-stripping are as follows:
hand (fig. 3-8). Allow the bolt to move slowly forward
1. Remove the sling, and place the rifle on a table
until it engages the bolt catch, and return the charging
or flat surface, muzzle to the left.
handle to its forward position.
2. Turn the weapon on its right side, keeping the
4. Inspect the receiver and chamber of the weapon,
muzzle to the left. Press the takedown pinto the right
by looking through the ejection port, to ensure these
(fig. 3-9) until the upper receiver swings free of the
spaces contain no ammunition.
lower receiver (fig. 3-10).
5. Check the selector lever to ensure it points
toward SAFE; then allow the bolt to go forward by
depressing the upper portion of the bolt catch.
CAUTION
CAUTION
The takedown pin does not come out of the
receiver.
The selector must be on SAFE to prevent
damage to the automatic sear during assembly
3. Press out the receiver pivot pin (fig. 3-11).
and disassembly.
Separate the upper and lower receiver groups (fig. 3-12),
and place the lower receiver group on the table.
FIELD-STRIPPING THE RIFLE
The individual Seabee is authorized to disassemble
CAUTION
the M16 to the extent termed field-stripping.
Field-stripping is done without supervision and is
adequate for normal maintenance. As the weapon is
The receiver pivot pin does not come out of
disassembled, lay out the parts on a table or other clean
the receiver.
3-4

