showing the pipe sleeve as it would look, viewed
from one side, if it were cut exactly in half
vertically. The surface of the imaginary cut is
crosshatched with lines called section lines.
According to DoD-STD-100C, “section lining
shall be composed of uniformly spaced lines at
an angle of 45 degrees to the baseline of the
section. On adjacent parts, the lines shall be drawn
in opposite directions. On a third part, adjacent
to two other parts, the section lining shall be
drawn at an angle of 30 to 60 degrees.”
The cross-hatching shown in figure 3-37 could
be used on any drawing of parts made of only one
material (like machine parts, for example, which
are generally made of metal). The cross-hatching
is the symbol for metals and may be used for a
section drawing of any type of material.
A section like the one shown in figure 3-37,
which goes all the way through and divides the
object into halves, is called a full section. If the
section showed the sleeve as it would look if cut
vertically into unequal parts, or cut only part way
through, it would be a partial section. If the cut
followed one vertical line part of the way down
and then was offset to a different line, it would
be an offset section.
VIEWING OR CUTTING PLANE LINES
VIEWING PLANE LINES are used to
indicate the plane or planes from which a surface
or several surfaces are viewed.
CUTTING PLANE LINES are used to
indicate a plane or planes in which a sectional view
is taken.
Section views are used to give a clearer view
of the interior or hidden feature of an object
that normally cannot be clearly observed in
conventional outside views.
A section view is obtained by cutting away part
of an object to show the shape and construction
at the cutting plane.
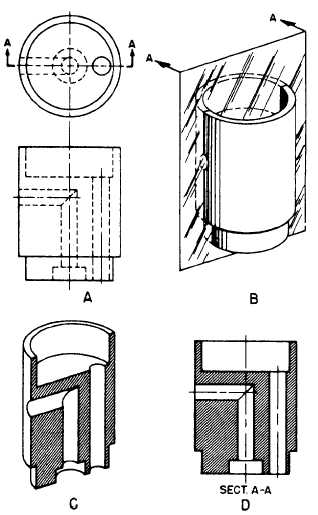
Notice the CUTTING PLANE LINE AA in
figure 3-38, view A. It shows where the imaginary
cut has been made. The single view in figure 3-38,
view B, helps you to visualize the cutting plane.
The arrows point in the direction in which you
are to look at the sectional view.
65.25
Figure 3-38.-Action of a cutting plane.
Figure 3-38, view C, is a front view showing
how the object would look if it were cut in half.
The orthographic section view of section A-A,
figure 3-38, view D, instead of the confusing front
view in figure 3-38, view A, is placed on the
drawing. Notice how much easier it is to read and
understand.
Note that hidden lines behind the plane of
projection are omitted in the sectional view. These
lines are omitted by general custom, the custom
being based on the fact that the elimination of
hidden lines is the basic reason for making a
sectional view. However, lines that would be
visible behind the plane projection must be
included in the section view.
Cutting plane lines, together with arrows and
letters, make up the cutting plane indications. The
arrows at the end of the cutting plane lines are
3-25


