DRAWING SYMBOLS
Because of the small scale used in most
drawings, standard graphic symbols are used to
present complete information concerning con-
struction items and materials. These typical
symbols are used so frequently in construction
drawings that their meanings must be familiar not
only to the preparer, but to the user as well. The
main information sources for a particular symbol
are the Military (Drawing) Standards (MIL-STD)
and the American National Standards Institute
(ANSI). Refer to these standards before you use
other references. Listed below are some of the
most commonly used military standards and the
particular symbols they carry.
Standard
Description
MIL-STD-14
Architectural Symbols (latest
revision)
MIL-STD-17-1
Mechanical Symbols (latest
revision)
MIL-STD-18
ANSI Y32.9-1972
Structural Symbols (latest
revision)
Graphic Symbols for Electrical
Wiring and Layout Diagrams
Used in Architecture and
Building Construction
ANSI Y32.4-1977
Graphic Symbols for Plumbing
Fixtures for Diagrams Used in
Architecture and Building Con-
struction
ANSI/AWS A2.4-1986
Symbols for Welding
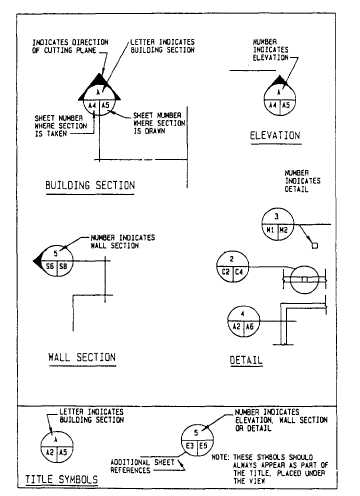
Sometimes you may notice that other sym-
bols are not included in any of the standards
mentioned earlier. These symbols, like the ones
shown in figure 10-6, can be found in one of the
military handbooks developed by NAV-
FACENGCOM for project drawings. As an EA,
you will find that your knowledge of applicable
symbols will greatly assist you in accomplishing
the job correctly and promptly, and, above all,
with confidence. Some of the basic architectural
and welding symbols are shown in figures 10-7
through 10-10. Other types of symbols are shown
in the appendix section of this book.
DRAWING NOTES
NOTES are brief, clear, and explicit
statements regarding material use and finish and
Figure 10-6.-Symbols used to identjfy sections, elevations,
and details.
construction methods. Notes in a construction
drawing are classified as specific and general.
SPECIFIC notes are used either to reflect
dimensioning information on the drawing or to
be explanatory. As a means of saving space, many
of the terms used in this type of notes are often
expressed as abbreviations.
GENERAL notes refer to all of the notes on
the drawing not accompanied by a leader and an
arrowhead. As used in this book, general notes
for a set of drawings covering one particular type
of work are placed on the first sheet of the set.
They should be placed a minimum of 3 in. below
the space provided for the revision block when
the conventional horizontal title block is used.
When the vertical title block is used, you may
place the general notes on the right side of the
drawing. General notes for architectural and
structural drawings may include, when applicable,
10-9


