view A, is the preferred method of drawing
dimension lines in many forms of drafting.
However, for construction drawings, it is
permissible, and in fact customary, to draw
dimension lines from one extension line to another
without breaking them. The numerals are then
placed above the dimension line and parallel to
the direction of measurement. This method is
easier and saves considerable time.
2. Dimension lines are to be aligned if
practical and grouped for uniform appearance,
as shown in figure 10-4, view B. The space
between the first dimension line and the object
line should be not less than 10 mm, minimum;
the space between succeeding parallel dimension
lines should be not less than 6 mm, minimum, as
shown in figure 10-4, view C. Where there are
several parallel dimension lines, you may stagger
the numerals for easier reading.
When using U.S. standards, you should ensure
that the minimum space between the first dimen-
sion line and the object line is 3/8 in., and the
succeeding parallel dimension lines are spaced at
least 1/4 in. apart.
3. An angle is to be dimensioned with an arc
drawn so that its center is at the apex of the angle
and the arrowheads terminate at the extension of
the two sides, as shown in figure 10-3.
4. Crossing dimension lines should be avoided
insofar as possible. If crossing them is un-
avoidable, dimension lines are to be unbroken.
Figure 3-23, chapter 3, shows the characteristics
of dimension lines.
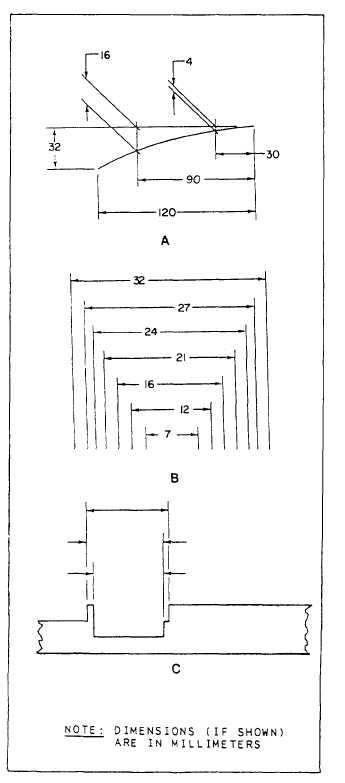
As explained in chapter 3, extension lines (also
called projection lines) are used to indicate the
extension of a surface or point to a location
outside the outline of the object (or view). They
are usually drawn perpendicular to dimension
lines. Where space is limited, you may draw
extension lines at an oblique angle. Figure 10-5,
view A, clearly shows this application. You should
also minimize the crossing of extension lines over
one another and over dimension lines by placing
the shortest dimension line closest to the outline
of the object, as shown in figure 10-5, view B.
Where extension lines cross arrowheads or dimen-
sion lines close to arrowheads (fig. 10-5, view C),
a break in the extension line is advisable. For
examples in the proper use of extension lines, refer
to chapter 3, figures 3-30 and 3-31. LEADERS
(or leader lines), also explained in chapter 3, direct
dimensions, notes, or symbols to the intended
place on the drawing.
Figure 10-5.-Applications of extension lines: A. Where
space is limited; B. Minimizing crossing of extension
lines; C. Where extension lines break.
10-8


