information. Dimensions should be selected to suit
the function and should not be subject to more
than one interpretation.
Detailed dimensioning format and standards
will be discussed freely in this chapter to meet
specific requirements. You will notice that dimen-
sioning construction or project drawings differs
in some applications from dimensioning general
technical drawings. This occurs primarily because
of the materials and methods of construction.
Units of Measure
As we stated earlier, the unit of measurement
selected should be according to the policy of the
user and the geographical area in which the
project plans will be used. The U.S. linear unit
commonly used on project drawings is the inch,
while that of SI (metric) linear units is the
millimeter. On drawings where all dimensions are
either in millimeters or inches, individual linear
unit identification is NOT required. However,
when this is the case, your drawing should
contain a note stating “UNLESS OTHERWISE
SPECIFIED, ALL DIMENSIONS ARE IN
INCHES” (or
“IN
MILLIMETERS,”
as
applicable). Millimeter dimension values shown
on an inch-dimensioned drawing must be followed
by the symbol mm, while inch dimension values
shown on a millimeter-dimensioned drawing will
be followed by the abbreviation IN.
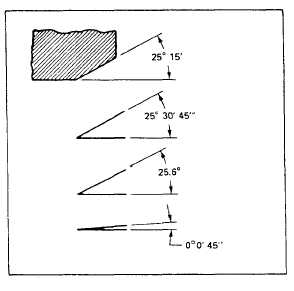
Similarly, dimensions for angular units are
expressed in either degrees and decimal parts of
a degree or in degrees, minutes, and seconds.
Refer to figure 10-3 for guidance, as applicable.
Figure 10-3.-Dimensioning angular units.
Application of Dimensions
Dimensions are applied by means of dimension
lines, extension lines, or a leader from a dimen-
sion, note, or specification directed to the
appropriate feature. Some of the standard rules
to be followed when you are drawing DIMEN-
SION LINES are as follows:
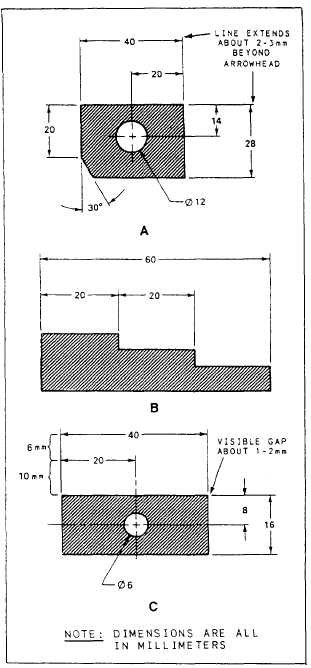
1. The breaking of dimension lines for
insertion of numerals, as shown in figure 10-4,
Figure 10-4.-Applications of dimensions and dimension
lines: A. Breaking dimension lines for insertion of
numerals; B. Grouping lines for uniform appearance;
C. Proper spacing of dimension lines from object.
10-7


